Features and Commands in Microsoft Project 2010 Menus and Toolbars
The following tabs list all features and commands included in Classic Menu for Project 2010 (it is part one of Classic Menu for Office 2010).
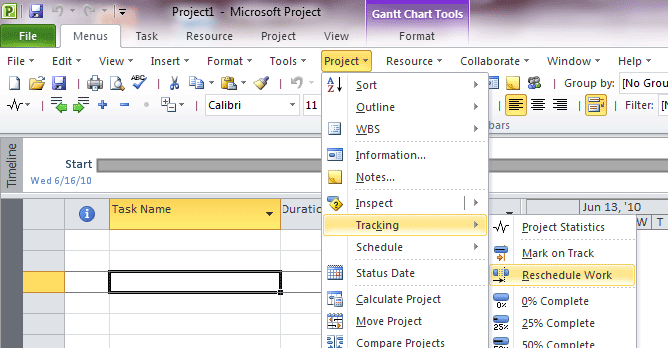
Main Menu of Project 2010
These features included in v3.50, more features have been added in later versions.
- File
- Edit
- View
- Insert
- Foramt
- Tools
- Project
- Resource
- Collaborate
- Window
- Help
File
| New | |
| Open | |
| Close | |
| *** | |
| *** | |
| Save | |
| Save As | |
| Save Workspace... | Save the current layout of all windows as a workspace so that it can be restored later. |
| Save for Sharing | |
| *** | |
| Sen&d To | |
| Exchange Folder... | |
| Publish | |
| Account Settings... | |
| Sync with Tasks List | |
| *** | |
| Check In... | |
| Check Out | |
| Version History | |
| *** | |
| Page Setup... | Show the Page Setup dialog box. |
| Print Preview | |
| *** | |
| Document Properties | |
| Work Offline | |
| *** | |
| *** | |
| Exit |
Edit
| Undo | |
| Redo | |
| *** | |
| Cut | Cut the selection and put it on the Clipboard. |
| Copy | Copy the selection and put it on the Clipboard. |
| Copy Picture | |
| Paste | Paste the contents of the Clipboard. |
| Paste Special... | |
| Paste as Hyperlink | |
| *** | |
| Fill | Continue a value into one or more adjacent cells. |
| Clear | Delete everything from the cell, or selectively remove the formatting, the contents, or the comments. |
| Delete | Delete this item. |
| *** | |
| Link Tasks | Link the selected tasks so that one task cannot start until another task is finished. -- -- You can also link tasks in other ways, for example, use a Start-to-Start link when two tasks need to start at the same time. |
| Unlink Tasks | Remove the link between the selected tasks. |
| Split Task | Split one task into two separate parts. -- -- Position the pointer on your task bar where you want the split to happen, and then drag the task bar to split it. |
| *** | |
| Find... | Find text in the document. |
| Replace... | Replace text in the document. |
| Go To... | Navigate to a specific place in the document. -- -- Depending on the type of document, you can navigate to a specific page number, line number, footnote, table, comment, or other object. |
| *** | |
| Edit Links to Files | |
| Convert... | |
| Scroll to Task | Move to the area on the view containing the task bar for the selected item. |
View
| Calendar | View the tasks from the project in a calendar view. |
| Gantt Chart | Switch to the Gantt Chart view. -- -- Click the arrow to select a different view. |
| Network Diagram | Display tasks represented as boxes and view dependencies between the tasks. |
| Task Usage | View all of the tasks and the resources assigned to them. -- -- Use this view to update data at the day, week, or other time increment level. |
| *** | |
| Other Views | Switch to a different resource view. -- -- Views in this category include the Resource Graph. -- -- You can also go to More Views to see all available views. |
| Resource Sheet | Update details about resources. |
| Resource Usage | View all of the resources and the tasks assigned to them. -- -- Use this view to update data at the day, week, or other time increment level. |
| *** | |
| More Views... | Show the More Views dialog box to see all of the available views. |
| Tables | Switch to a different table. -- -- A table is a set of columns that can be used to easily see a different set of data in the view. -- -- For example, the cost table shows cost fields. |
| *** | |
| Reports | Create and print basic predefined task, resource, and crosstab reports爐o help present your project data to other people. |
| Visual Reports | View the project's data in PivotTables in Microsoft Excel and PivotDiagrams in Microsoft Visio Professional. |
| *** | |
| Timeline | Create a high level view of your project. -- -- You can add tasks to the timeline by right-clicking and selecting Display on Timeline. |
| Details | Split the screen and show the details pane on the lower part of the screen. -- -- The details pane shows additional information about the selected task or resource. |
| Change Highlighting | |
| *** | |
| Outline Number | Show the outline number next to the task name. |
| Project Summary Task | Show the summary task for the project. |
| Summary Tasks | Display summary tasks in the view. |
| *** | |
| Header & Footer... | Edit the Header or Footer of the document. -- -- The information in the Header or Footer will appear at the top or bottom of each printed page. |
| Zoom... | Show the Zoom dialog box to specify the zoom level of the project. |
Insert
| &New Task | Insert a new task above the selected task. -- -- New tasks are scheduled based on the Schedule Mode setting. |
| Add Resources | Add resources to the project. -- -- Resources are any of the people, equipment, or materials used to complete the tasks in the project. |
| Recurring Task... | Insert a task that occurs regularly through the course of the project. -- -- For example, you might define a weekly status meeting as a recurring task. |
| &Project... | Insert a related project as a subproject. -- -- You can more easily manage multiple, related project by having one master project, with multiple subprojects within it. |
| &Column... | |
| *** | |
| Insert Page Break | |
| *** | |
| Drawing | Insert or update a drawing. |
| Object... | Insert an embedded object. |
| Hyperlink... | Create a link to a Web page, a picture, an e-mail address, or a program. |
| *** | |
| Deliverable | Add or update any deliverables or dependencies that are in the project to track dependencies between multiple projects. -- -- To use this command, you must be connected to Project Server, have published the project, and created a workspace site. |
| Blank Row | |
| Milestone | Insert a milestone task to mark an event in the project. -- -- Milestone tasks are tasks with a zero day duration. |
| *** | |
| Summary | Insert a summary task to help organize the task list. -- -- If any tasks are selected, they are grouped under the newly created summary task. |
Format
| Font... | Show the Font dialog box. |
| Bar | Change the visual style of the Gantt bar for the selected task. |
| Timescale... | |
| Gridlines... | Change the look of gridlines in the view. |
| *** | |
| Gantt Chart Wizard... | |
| Gantt Chart Gallery | Quickly format the Gantt chart by choosing from pre-defined styles. |
| Text Styles... | Change the visual style of the text for a particular type of item in the view. -- -- For example, you can update a type of tasks to have bold type. |
| Bar Styles | Change the visual style of a particular type of bar for the entire view. |
| *** | |
| Layout | Format various aspects of the current view. |
| Layout Now | Change the way tasks are arranged in the view. |
| *** | |
| D&rawing | Insert or update a drawing. |
| Bring &to Front | Bring the selected object in front of all other objects so that no part of it is hidden behind another object. |
| &Send To Back | Send the selected object behind all other objects. |
| &Properties | |
| *** | |
| Slack | Show a line to represent slack. -- -- Slack, also known as float, shows how much a task can slip before it affects another task or the project finish date. |
| Late Tasks | Show late tasks in black. -- -- Late tasks are calculated by comparing how much of that task should be done by the status date. -- -- You can set the status date on the Project tab. |
| Critical Tasks | Show critical tasks in red. -- -- A task is critical if it must be completed on schedule for the project to finish on schedule. |
| *** | |
| Baseline | Show a bar to represent a baseline. -- -- You can save a baseline on the Project tab. |
| Slippage | Show a line representing how tasks have slipped in the project compared to the selected baseline. -- -- You can save a baseline on the Project tab. |
| *** | |
| Column Settings | Insert, hide, or update a column in the view. |
Tools
| Spelling... | Check the spelling of text. |
| AutoCorrect Options... | |
| Document Management | |
| *** | |
| Links Between Projects... | Review information about tasks linked to and from other projects. -- -- You can also update or delete the links between projects. |
| Import Outlook Tasks... | Import tasks from Microsoft Outlook. |
| *** | |
| Change Working Time... | Set days off and change the working hours for the project or for specific resources. |
| *** | |
| Assign Resources... | Assign resources to the tasks in the project. |
| Build Team from Enterprise... | Add resources from Project Server to the project. -- -- You must be connected to Project Server to use this command. |
| Substitute Resources | Substitute resources in your project based on availability and the required skills for assignments. -- -- You must be connected to Project Server to use this command. |
| Local Pro&ject Cache | |
| Cleanup Cache | |
| View Status | |
| Share Resources... | |
| Level Resource | Level tasks for the selected resources. -- -- Leveling resolves resource conflicts or overallocations by delaying or splitting tasks, based on the settings in the Leveling Options dialog box. |
| Trac&king | |
| Update Tasks | Show the Update Tasks dialog box. -- -- You can update information for the selected tasks, such as mark percent complete, set actual or remaining duration, modify actual start and finish dates, and create notes. |
| Update Project... | Update progress information and reschedule work for some or all of the tasks in the project. |
| Sync to Protected Actuals | Update actual fields with the values that are set for them on the server. -- -- This overwrites any edits that you made to the field within the Project client. |
| *** | |
| Progress Lines | Insert or update progress lines in the Gantt chart. -- -- You can have multiple progress lines to represent how much work has been completed in a certain time period. |
| Set Baseline... | Take a snapshot of your schedule that includes information about tasks, resources, and assignments. -- -- Compare multiple baselines to see how your project has changed over time. |
| Clear Baseline | Delete a baseline that was previously set. |
| *** | |
| &Macro | Click here to record a macro or to access other macro options. |
| Organizer | Copy elements, such as views, groups, and filters between the current project and the global template or another project. -- -- The global template contains information that you can use for different projects. |
| *** | |
| Custom Fields | Show the Custom Fields dialog box to create custom fields to store information specific to your organization. |
| Options | |
| &Enterprise Options | |
| Microsoft Project Server Accounts... | |
| *** | |
| Open Enterprise Global | Open the enterprise global template. -- -- By using this template, you can add and update elements such as views, groups, and filters to ensure that all projects within the same organization follow standards. |
| Enterprise Resource Pool | Open the enterprise resource pool for the Project Server you are connected to. -- -- You can update information for enterprise resources, such as resource rates, and add resources to the enterprise. -- -- You must be connected to Project Server to use this command. |
| *** | |
| Import Project to Enterprise... | |
| Import Resources to Enterprise | Add resources to Project Server so the resources can be used by other projects also on the server. -- -- You must be connected to Project Server to use this command. |
Project
| Sort | Arrange the items in the view. |
| &Outline | |
| Indent | Indent the selected tasks one level at a time. -- -- When you indent a task, it becomes a subtask of the nearest preceding task at a higher level in the task list. |
| Outdent | Outdent the selected tasks one level at a time. -- -- When you outdent a task, it becomes a summary task of any tasks directly following it at a lower level in the task list. |
| *** | |
| Show Subtasks | |
| Hide Subtasks | |
| Assignments | |
| *** | |
| Outline | Specify which outline level should be used in the view. -- -- For a large project, you may want to collapse everything to outline level 1 or 2 and then expand only the sections that interest you. |
| *** | |
| Outline Symbols | |
| WBS | Define or renumber the work breakdown structure (WBS). -- -- The WBS is an alphanumeric code that uniquely identifies the task's place in the outline structure. |
| *** | |
| Information... | Show the Task Information dialog box for the selected task. -- -- You can update various aspects of the task, such as resource assignments, predecessors, and custom fields. |
| Notes... | Show the Notes tab in the Task Information dialog box to write a note relevant to the selected task. |
| *** | |
| Inspect | Show the Task Inspector to see factors affecting the task's start date, and error messages or suggestions for the task. -- -- You can also control which messages are displayed in the task view. |
| Trac&king | |
| Project Statistics | |
| *** | |
| Update as Scheduled | Mark the selected tasks so that they are on schedule. -- -- Set the status date on the Project tab to control what date is used in this calculation. |
| Reschedule Work | |
| *** | |
| 0% Complete | Mark the selected tasks as 0% complete. |
| 25% Complete | Mark the selected tasks as 25% complete. |
| 50% Complete | Mark the selected tasks as 50% complete. |
| 75% Complete | Mark the selected tasks as 75% complete. |
| 100% Complete | Mark the selected tasks as 100% complete. |
| *** | |
| Update Tasks | Show the Update Tasks dialog box. -- -- You can update information for the selected tasks, such as mark percent complete, set actual or remaining duration, modify actual start and finish dates, and create notes. |
| Set Reminder... | |
| *** | |
| Respect Links | Move the selected tasks so that their dates are determined by any task dependencies they have. |
| Inactivate | Make the selected tasks inactive so that the tasks no longer affect the schedule. -- -- The tasks remain in the project, but they do not affect resource availability or how other tasks are scheduled. |
| Schedule | |
| Manually Schedule | Update the selected tasks to be manually scheduled so that the values you enter for Start, Finish, and Durations are not automatically updated. -- -- Microsoft Project may warn you if there are potential issues with the values you enter. |
| Auto Schedule | Automatically calculate the Start, Finish, and Duration values for this task based on dependencies, constraints, calendar, and other factors. |
| *** | |
| Move | Move the selected tasks forward or back in the project schedule. -- -- You can also move the task to when the resources are available to work on the task. |
| Mode | Choose whether new tasks are created without dates or are automatically scheduled to start on either the project start date or the current date. -- -- This setting does not affect existing tasks in the project plan. |
| *** | |
| Status Date | Set the status date to report progress of the project. -- -- The status date is used for progress and earned value calculations. -- -- If you do not set the status date, it defaults to the current date. |
| *** | |
| Calculate Project | Calculate the project after you make a change. -- -- Calculating your project is only necessary if you have turned off calculations in the Project Options dialog box. |
| Move Project | Adjust the start and finish dates for all tasks based on the new project start date. |
| Compare Projects | Compare two versions of a project. -- -- A comparison report is created to show you the differences between the two projects, such as if new tasks were added. |
| *** | |
| Add to Timeline | Add the selected task to the timeline. -- -- The timeline, if visible, is at the top of the screen. |
| *** | |
| Project Information... | Display the Project Information dialog box to update various aspects of the project, such as start date and status date. |
Resource
| Assign Resources... | Assign resources to the tasks in the project. |
| Resource Pool | Share resources among multiple projects through a resource pool. -- -- You can use a resource pool to schedule the work of resources across multiple projects and identify conflicts between their assignments in different projects. -- -- You do not need to create a resource pool if you use Project Server. |
| *** | |
| Substitute Resources | Substitute resources in your project based on availability and the required skills for assignments. -- -- You must be connected to Project Server to use this command. |
| *** | |
| Information... | Show the Resource Information dialog box for the selected resource. -- -- You can update various aspects of the resource, such as cost rates and custom fields. -- -- You must be in a resource view to use this command. |
| Notes... | Write a note relevant to the resource. -- -- You must be in a resource view to use this command. |
| *** | |
| Level Selection | Level the selected tasks. -- -- Leveling resolves resource conflicts or overallocations by delaying or splitting tasks, based on the settings in the Leveling Options dialog box. |
| Level Resource | Level tasks for the selected resources. -- -- Leveling resolves resource conflicts or overallocations by delaying or splitting tasks, based on the settings in the Leveling Options dialog box. |
| Level All | Level the entire project. -- -- Leveling resolves resource conflicts or overallocations by delaying or splitting tasks, based on the settings in the Leveling Options dialog box. |
| Leveling Options | Show the Leveling Options dialog box to set how Project levels the tasks. |
| Clear Leveling | Clear any leveling delay that was previously added to the project. -- -- You can either clear leveling for the entire project or just for the selected tasks. |
| Next Overallocation | Move to the next row where a resource is scheduled for more work than can be accomplished in the available working time. |
Collaborate
| Project Information... | Display the Project Information dialog box to update various aspects of the project, such as start date and status date. |
| Request Progress Information | |
| Update Project Progress | |
| *** | |
| Project Center | |
| Resource Center | |
| *** | |
| Data Analysis | |
| *** | |
| Risks | |
| Issues | |
| Documents | |
| *** | |
| Manage Deliverables | |
| Manage Dependencies |
Window
| New Window | Open a new window containing a view of the current document. |
| Arrange All | Tile all open program windows side-by-side on the screen. |
| Hide | Hide the current window so that it cannot be seen. -- -- To bring the window back, click the Unhide button. |
| Unhide... | Unhide any windows hidden by the Hide Window feature. |
| *** | |
| Switch Windows | Switch to a different currently open window. |
Help
| Help | |
| *** | |
| Office.com | |
| *** | |
| Activate Product... | |
| Customer Feedback Options... | |
| *** | |
| Privacy Statement | |
| About |
Standard and Formatting Toolbars
- Standard Toolbar
- Formatting Toolbar
Standard Toolbar
| New | |
| Open | |
| Save | |
| | | |
| Print Preview | |
| Spelling... | Check the spelling of text. |
| | | |
| Cut | Cut the selection and put it on the Clipboard. |
| Copy | Click here to copy a picture of the view and put it on the clipboard. |
| Paste | Click here for more options such as pasting only the values or formatting. |
| Format Painter | Copy formatting from one place and apply it to another. |
| | | |
| Undo | |
| Redo | |
| | | |
| Hyperlink... | Create a link to a Web page, a picture, an e-mail address, or a program. |
| | | |
| Link Tasks | Link the selected tasks so that one task cannot start until another task is finished. -- -- You can also link tasks in other ways, for example, use a Start-to-Start link when two tasks need to start at the same time. |
| Unlink Tasks | Remove the link between the selected tasks. |
| Split Task | Split one task into two separate parts. -- -- Position the pointer on your task bar where you want the split to happen, and then drag the task bar to split it. |
| | | |
| Information... | Show the Task Information dialog box for the selected task. -- -- You can update various aspects of the task, such as resource assignments, predecessors, and custom fields. |
| Notes... | Show the Notes tab in the Task Information dialog box to write a note relevant to the selected task. |
| Assign Resources... | Assign resources to the tasks in the project. |
| | | |
| Group by: | Group the items in the view by specified criteria. -- -- For example, you can group by Status to see how much work has been completed, how much is running late, and how much remains. |
| Highlight: | Highlight items in the view based on the selected criteria. -- -- For example, you can highlight milestones or tasks assigned to a specified resource. |
| | | |
| Zoom In | |
| Zoom Out | |
| Scroll to Task | Move to the area on the view containing the task bar for the selected item. |
| | | |
| Copy Picture | |
| Help | Get help using Microsoft Office. |
Formatting Toolbar
| Trac&king | |
| Project Statistics | |
| *** | |
| Update as Scheduled | Mark the selected tasks so that they are on schedule. -- -- Set the status date on the Project tab to control what date is used in this calculation. |
| Reschedule Work | |
| *** | |
| Progress Lines | Insert or update progress lines in the Gantt chart. -- -- You can have multiple progress lines to represent how much work has been completed in a certain time period. |
| *** | |
| 0% Complete | Mark the selected tasks as 0% complete. |
| 25% Complete | Mark the selected tasks as 25% complete. |
| 50% Complete | Mark the selected tasks as 50% complete. |
| 75% Complete | Mark the selected tasks as 75% complete. |
| 100% Complete | Mark the selected tasks as 100% complete. |
| *** | |
| Update Tasks | Show the Update Tasks dialog box. -- -- You can update information for the selected tasks, such as mark percent complete, set actual or remaining duration, modify actual start and finish dates, and create notes. |
| Set Reminder... | |
| *** | |
| Respect Links | Move the selected tasks so that their dates are determined by any task dependencies they have. |
| Inactivate | Make the selected tasks inactive so that the tasks no longer affect the schedule. -- -- The tasks remain in the project, but they do not affect resource availability or how other tasks are scheduled. |
| | | |
| Outdent | Outdent the selected tasks one level at a time. -- -- When you outdent a task, it becomes a summary task of any tasks directly following it at a lower level in the task list. |
| Indent | Indent the selected tasks one level at a time. -- -- When you indent a task, it becomes a subtask of the nearest preceding task at a higher level in the task list. |
| Show Subtasks | |
| Hide Subtasks | |
| Assignments | |
| Outline | Specify which outline level should be used in the view. -- -- For a large project, you may want to collapse everything to outline level 1 or 2 and then expand only the sections that interest you. |
| | | |
| Font: | Change the font face. |
| Font Size: | Change the font size. |
| Bold | Make the selected text bold. |
| Italic | Italicize the selected text. |
| Underline | Underline the selected text. |
| | | |
| Background Color | Color the background of the selected items. |
| Font Color | Change the text color. |
| | | |
| Align Left | Align text to the left. |
| Center | Center text. |
| Align Right | Align text to the right. |
| | | |
| Wrap Text | Make all content visible within a cell by displaying it on multiple lines. |
| | | |
| Filter: | Filter the view based on the selected criteria. -- -- For example, you can show only incomplete tasks or late tasks. |
| Timescale: | Update the time unit that appears on the timescale. -- -- The timescale is the time period indicator at the top of the view. |
| | | |
| Display AutoFilter | |
| Gantt Chart Wizard... | |
| Task | |
| Resource | |
| Project | |
| View | |
| Developer | |
| Compare Projects |
Classic Menu for Office Enterprise
|
|
More Screen Shots...