Features and Commands in Microsoft Publisher 2010 Menus and Toolbars
The following tabs list all features and commands included in Classic Menu for Publisher 2010 (it is part one of Classic Menu for Office 2010).
Main Menu of Publisher 2010
These features included in v3.50, more features have been added in later versions.
- File
- Edit
- View
- Insert
- Foramt
- Tools
- Table
- Arrange
- Mailings
- Window
- Help
File
| New | |
| Open | |
| Close | |
| *** | |
| Save | |
| Save As | |
| Publish to Web | |
| Publish as PDF or XPS | |
| Pac&k and Go | |
| Take to Another Computer... | |
| Take to a Commercial Printing Service... | |
| *** | |
| Convert to Web Publication... | |
| Convert to Print Publication... | |
| *** | |
| Web Page Preview | View your web pages inside your default browser. |
| *** | |
| *** | |
| Page Setup... | Show the Page Setup dialog box. |
| Page Setup... | |
| Page Setup... | Show the Page Setup dialog box. |
| Margins | Select the margin sizes for the entire document or the current section. |
| Orientation | Switch the pages between portrait and landscape layouts. |
| Size | Choose a paper size for the current section. -- -- To apply a specific paper size to all sections in the document, click More Paper Sizes. |
| Print Preview | |
| *** | |
| Sen&d E-mail | |
| Mail Recipient | |
| E-mail All Pages | |
| *** | |
| Mail Recipient (as Attachment) | |
| E-mail as PDF Attachment | |
| E-mail as XPS Attachment | |
| *** | |
| E-mail Preview | |
| Properties | |
| *** | |
| Open Recent File... | |
| Exit |
Edit
| Undo | |
| Redo | |
| *** | |
| Cut | Cut the selection and put it on the Clipboard. |
| Copy | Copy the selection and put it on the Clipboard. |
| Office Clipboard... | Show the Office Clipboard Task Pane. |
| Paste | Click here for more options such as pasting only the values or formatting. |
| *** | |
| Delete Text | |
| Delete Object | |
| Delete P&age | Remove the selected page and its content from the publication. |
| &Move Page... | Change the location of the selected page to before or after another page in the publication. |
| Rename... | Change the name of the selected page. |
| *** | |
| Select All | Select all items. |
| Select All Text in Text Box | |
| *** | |
| Find... | Find text in the document. |
| Replace... | Replace text in the document. |
| Go to Page... | |
| *** | |
| Edit Links to Files | |
| Edit Story in Microsoft Word | |
| &Object | |
| Edit Object | |
| Open Object | |
| *** | |
| Convert... | |
| *** | |
| Edit Business Information... |
View
| Single Page | View each page of the publication separately. |
| Two-Page Spread | View facing pages of the publication at the same time. -- -- A two-page spread is a printing convention that represents leading and trailing pages in a bound or folded project. |
| *** | |
| Normal | View and edit the main pages of your publication. |
| Master Page | Open the master page view to edit the design and layout of your master pages. |
| *** | |
| Ruler | View the rulers, used to measure and line up objects in the document. |
| Show All | Show paragraph marks and other hidden formatting symbols. |
| Boundaries | Show the boundaries for shapes, text boxes, and pictures. |
| Guides | Show adjustable drawing guides to which you can align objects on the slide. |
| Horizontal Baselines | Show horizontal baselines, used to help you align objects to the baselines of horizontal text in the publication. |
| Vertical Baselines | Show vertical baselines, used to help you align objects to the baselines of vertical text in the publication. |
| *** | |
| Fields | Show which items in your publication are fields. |
| Page Navigation | Show the Page Navigation pane, which displays an image of each page in the publication. |
| Scratch Area | Show the objects or portions of objects that are located outside of the page boundaries. |
| Baselines | Show baselines, used to help you align objects to the baselines of text in the publication. |
| *** | |
| Enclose Characters... | Emphasize a character by placing a circle or box around it. |
| Pictures... | |
| *** | |
| Show Header/Footer | Show the header and footer areas on the current master page. |
| *** | |
| &Zoom | |
| 100% | Zoom the document to 100% of the normal size. |
| One Page | Zoom the document so that an entire page fits in the window. |
| Page Width | Zoom the document so that the width of the page matches the width of the window. |
| Selected Objects | Zoom the document so that the selected object fills the window. |
Insert
| Page | Insert pages into the publication. |
| Page Number | Insert a field that displays the current page number. -- -- As more pages are added or removed from the publication, this page number updates. |
| Date & Time... | Insert the current date or time into the current document. |
| Symbol | Insert symbols that are not on your keyboard, such as copyright symbols, trademark symbols, paragraph marks, and Unicode characters. |
| *** | |
| Save as &Building Block... | |
| Add Selection to Advertisements Gallery | |
| Add Selection to Business Information Gallery | |
| Add Selection to Calendars Gallery | |
| Add Selection to Design Accents Gallery | |
| Add Selection to Page Parts Gallery | |
| Business Information | Insert a field or a design object that displays your business contact information. |
| Page Parts | Insert a design object that you can use to help create your publication. |
| Calendars | Insert a calendar of the current month or next month. -- -- For other dates, select More Calendars. |
| Borders & Accents | Insert a graphical element that you can use to enhance the visual appearance of your publication. |
| Advertisements | Insert an advertisement into your publication. |
| Building Block Library | Show the Building Block Library dialog box. |
| *** | |
| &Picture | |
| Clip Art... | Insert Clip Art into the document, including drawings, movies, sounds, or stock photography to illustrate a specific concept. |
| Picture... | Insert a picture from a file. |
| Picture Placeholder | Insert an empty picture frame to reserve space for pictures you want to add later. -- -- You can insert a picture into the picture frame by clicking the picture icon. |
| *** | |
| Shapes | Insert ready-made shapes, such as rectangles and circles, arrows, lines, flowchart symbols, and callouts. |
| WordArt | Insert decorative text in your document. |
| Map... | |
| Te&xt Box | |
| Text Box | Insert a text box into the document, or add text to the selected shape. |
| Vertical Text Box | Insert a text box containing vertical text. |
| Text from File... | Insert the text from a file into your publication. -- -- If you have a text box selected, the text is added to the selected text box; otherwise, a new text box is created. |
| *** | |
| Object... | Insert an embedded object. |
| Hyperlink... | Create a link to a Web page, a picture, an e-mail address, or a program. |
| Bookmark... | Insert a bookmark into the publication. -- -- Bookmarks appear as graphical elements on the page, and allow you to add hyperlinks to that location in the publication. |
| *** | |
| Header | Edit the header of the publication. -- -- The content in the header will appear at the top of each page associated with the master page. |
| Footer | Edit the footer of the publication. -- -- The content of the footer will appear at the bottom of each page associated with the master page. |
Format
| Font... | Show the Font dialog box. |
| Character Spacing | Adjust the spacing between characters |
| Paragraph... | Show the Paragraph dialog box. |
| Bullets and Numbering... | |
| Horizontal Rules... | |
| *** | |
| Tabs... | |
| Drop Cap | Create a large capital letter at the beginning of a paragraph. |
| Number Style | Choose a display style for the numbers in the selected text. -- -- Some fonts include different numerical styles with varied spacing, vertical positioning, and appearance that may work better in the context of your publication. |
| Ligatures | Turn on ligatures in the selected text. -- -- Some fonts include ligatures, which are combinations of two or more characters into a single character to create more readable or attractive text. |
| *** | |
| Text Fit | Change the behavior for fitting text inside a text box. |
| &Asian Layout | |
| Phonetic Guide... | Display phonetic characters to clarify the pronunciation. |
| Enclose Characters... | Emphasize a character by placing a circle or box around it. |
| Horizontal in Vertical... | Change the orientation of the selected text to horizontal while keeping the remaining text vertical. |
| *** | |
| Background | Change the background formatting for the current page. |
| Change Template | Select a new template for the publication, and move your existing content to the new publication. -- -- You can choose to replace the current publication or create a new one. |
| Pa&ge Options... | Choose formatting options for the template page. -- -- Template options are available for newsletter, catalog, greeting card, and invitation card templates. |
| &Color Schemes... | Change the color scheme associated with the publication. |
| Fonts | Change the font scheme associated with the publication. |
| Styles | Specify a style to apply to the paragraph of the selected text. |
| Master Pages | Apply a master page to the publication, or edit existing master pages. -- -- Master Pages contain the elements that you want to repeat on multiple pages in a publication. |
| *** | |
| Format Object... | Show the Format Shape dialog box. |
Tools
| Spelling... | Check the spelling of text. |
| Research... | Open the Research Task Pane to search through reference materials, such as dictionaries, encyclopedias, and translation services. |
| Thesaurus... | Suggests other words with a similar meaning to the word you have selected. |
| Edit Business Information... | |
| *** | |
| Design Checker... | |
| Graphics Manager... | Show the Graphics Manager pane to review and manage the images in the publication. |
| Commercial &Printing Tools | |
| Fonts... | |
| Color Printing... | |
| *** | |
| Translate | Translate selected text into a different language. |
| Language | Select language options. |
| Hyphenation Options... | Change the hyphenation behavior of the selected text. |
| Reconvert | |
| Update IME Dictionary... | Add the selected word to the IME dictionary so that it can be recognized in the future. |
| Hangul Hanja Conversion | Convert between Hangul and Hanja characters. |
| *** | |
| &Macro | |
| Macros | View the list of macros, from which you can run, create, or delete a macro. |
| Macro Security | Customize the macro security settings. |
| Visual Basic | Open the Visual Basic editor. |
| Add-Ins... | Manage the add-ins available for use with this file. |
| AutoCorrect Options... | |
| Trust Center... | |
| Options |
Table
| Table | Insert or draw a table into the document. |
| &Insert | |
| Insert Left | Add a new column directly to the left of the selected column. |
| Insert Right | Add a new column directly to the right of the selected column. |
| Insert Above | Add a new row directly above the selected row. |
| Insert Below | Add a new row directly below the selected row. |
| &Delete | |
| Delete Table | |
| Delete Columns | |
| Delete Rows | |
| &Select | |
| Select Table | |
| Select Column | |
| Select Row | |
| Select Cell | |
| Merge Cells | Merge the selected cells into one cell. |
| Split Cells... | Split the selected cells into multiple new cells. |
| Diagonals | Split the selected cells diagonally into multiple new cells. |
| *** | |
| Table AutoFormat... | |
| Table Formats | Choose a visual style for the table. |
| Fill | Fill the selected cell with a solid color. |
| Pen Color | Change the pen color. |
| Borders | Customize the borders of the selected cells or text. |
| *** | |
| Size... | Show a dialog box to change the size of the shape or picture. |
| Grow to Fit Text | Allow the table to grow as more text is added. |
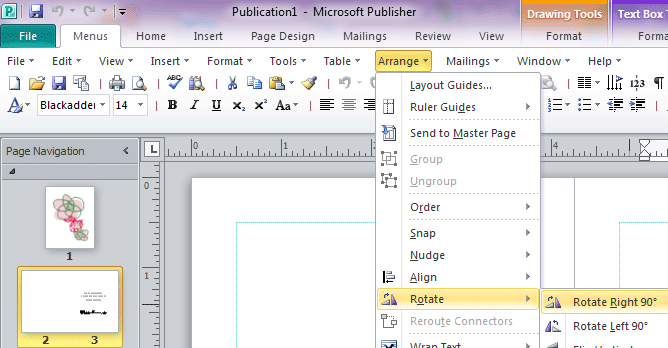
Arrange
| &Layout Guides... | |
| Ruler Gui&des | Insert a set of layout guides that create a grid pattern. -- -- Layout guides help you align objects in your publication. |
| *** | |
| Send to Master Page | Move the selected object to the master page associated with the current page. -- -- Once the object is moved to the master page, you must switch to master page view to edit it. |
| *** | |
| Group | Join two or more selected objects together so they will be treated as one object. |
| Ungroup | Break a set of grouped objects back into individual objects. |
| *** | |
| O&rder | |
| Bring to Front | Bring the selected object in front of all other objects so that no part of it is hidden behind another object. |
| Send to Back | Send the selected object behind all other objects. |
| Bring Forward | Bring the selected object forward so that it is hidden by fewer objects that are in front of it. |
| Send Backward | Send the selected object backward so that it is hidden by the objects that are in front of it. |
| *** | |
| &Snap | |
| Snap to Ruler Marks | |
| Align to Guides | Allow objects to snap to guides. |
| Align to Objects | Allow objects to snap to other objects on the page. |
| &Nudge | |
| Up | |
| Down | |
| Left | |
| Right | |
| Align | Align the edges of multiple selected objects. -- -- You can also center them or distribute them evenly across the page. |
| Rotate | Rotate or flip the selected object. |
| Reroute Connectors | |
| *** | |
| Wrap Text | Change the way text wraps around objects. -- -- To configure an object so that it moves along with the text around it, select In Line with Text. |
| Edit Points | |
| Change Shape | Change the shape of the drawing, preserving all the formatting. |
Mailings
| Start Mail Merge | Start a mail merge to create a form letter which you intend to print or e-mail multiple times, sending each copy to a different recipient. -- -- You can insert fields, such as Name or Address, which Word will replace automatically with information from a database or contact list for each copy of the form letter. |
| Start E-mail Merge | Merge data into a publication that will be sent as e-mail. |
| Catalog Pages | Insert a new page where you can start a catalog merge. |
| Select Recipients | Choose the list of people you intend to send the letter to. -- -- You can type your own list, use your Outlook contacts, or connect to a database. |
| Edit Recipient List... | Make changes to the list of recipients and decide which of them should receive your letter. -- -- You can also sort, filter, find and remove duplicates, or validate addresses from the list. |
| E-mail Preview | |
| *** | |
| Insert Merge Field | Add a field from your recipient list to the publication. -- -- When you finish the merge, the fields will be replaced with the actual information from the recipient list. |
| Address Block... | Add an address to your letter. -- -- You specify the formatting and location, and Word will replace it with actual addresses from your recipient list when you finish the mail merge. |
| Greeting Line... | Add a greeting line such as "Dear <<First Name>>." to your document. |
| Picture | Add a picture field from your recipient list to the publication. -- -- When you finish the merge, the fields will be replaced with the actual picture from the recipient list. |
| Insert Personalized Hyperlink... | Insert hyperlinks that are customized for each recipient. |
| Format | Change the format for the field contents, such as date format or number format. |
| *** | |
| Preview Results | Replace the merge fields in your document with actual data from your recipient list so you can see what it looks like. |
| First | Preview the first record in the recipient list. |
| Previous | Preview the previous record in the recipient list. |
| Next | Preview the next record in the recipient list. |
| Last | Preview the last record in the recipient list. |
| Find Recipient... | Find and preview a specific record in the recipient list by searching for text. |
| Exclude This Recipient | Remove the selected recipient from the final merged results. |
| *** | |
| Finish & Merge | Complete the mail merge. -- -- You can create separate documents for each copy of the letter, send them all directly to the printer, or send them via e-mail. |
| Follow-up | Prepare to follow up on this mailing. |
Window
| Arrange All | Tile all open program windows side-by-side on the screen. |
| Cascade | Cascade the open document windows on the screen so that they overlap. |
| *** | |
| Switch Windows | Switch to a different currently open window. |
Help
| Microsoft Publisher &Help | Get help using Microsoft Office. |
| &About Microsoft Publisher |
Standard and Formatting Toolbars
- Standard Toolbar
- Formatting Toolbar
Standard Toolbar
| New | |
| Open | |
| Save | |
| E-mail All Pages | |
| | | |
| Print Preview | |
| | | |
| Spelling... | Check the spelling of text. |
| Research... | Open the Research Task Pane to search through reference materials, such as dictionaries, encyclopedias, and translation services. |
| | | |
| Cut | Cut the selection and put it on the Clipboard. |
| Copy | Copy the selection and put it on the Clipboard. |
| Paste | Click here for more options such as pasting only the values or formatting. |
| Format Painter | Copy formatting from one place and apply it to another. -- -- Double-click this button to apply the same formatting to multiple places in the document. |
| | | |
| Undo | |
| Redo | |
| | | |
| O&rder | |
| Bring to Front | Bring the selected object in front of all other objects so that no part of it is hidden behind another object. |
| Send to Back | Send the selected object behind all other objects. |
| Bring Forward | Bring the selected object forward so that it is hidden by fewer objects that are in front of it. |
| Send Backward | Send the selected object backward so that it is hidden by the objects that are in front of it. |
| Align | Align the edges of multiple selected objects. -- -- You can also center them or distribute them evenly across the page. |
| Rotate | Rotate or flip the selected object. |
| | | |
| Hyperlink... | Create a link to a Web page, a picture, an e-mail address, or a program. |
| Web Page Preview | View your web pages inside your default browser. |
| | | |
| Columns | Split text into two or more columns. |
| Text Direction | Change the orientation of text to vertical. |
| Horizontal in Vertical... | Change the orientation of the selected text to horizontal while keeping the remaining text vertical. |
| Show All | Show paragraph marks and other hidden formatting symbols. |
| | | |
| Page | Insert pages into the publication. |
| Text Box | Insert a text box into the document, or add text to the selected shape. |
| Building Block Library | Show the Building Block Library dialog box. |
| | | |
| Zoom: | Specify the zoom level of the publication. |
Formatting Toolbar
| Styles | Specify a style to apply to the paragraph of the selected text. |
| Font: | Change the font face. |
| Font Size: | Change the font size. |
| | | |
| Bold | Make the selected text bold. |
| Italic | Italicize the selected text. |
| Underline | Underline the selected text. |
| Subscript | Create small letters below the text baseline. |
| Superscript | Create small letters above the line of text. |
| Change Case | Change the selected text to small cap text, to all cap text, or back to normal text. |
| | | |
| Align Left | Align text to the left. |
| Center | |
| Align Right | Align text to the right. |
| Justify | Align text to both the left and right margins, adding extra space between words as necessary. -- -- This creates a clean look along the left and right side of the page. |
| Distribute All Lines | Align paragraph to both the left and right margins by adding extra space between characters as necessary. |
| | | |
| Character Spacing | Adjust the spacing between characters |
| Line Spacing | Specify the line spacing to use. |
| Paragraph Spacing | Specify the paragraph spacing to use. |
| | | |
| Numbering | Start a numbered list. -- -- Click the arrow to choose different numbering formats. |
| Bullets | Start a bulleted list. -- -- Click the arrow to choose different bullet styles. |
| Decrease Indent | Decrease the indent level of the paragraph. |
| Increase Indent | Increase the indent level of the paragraph. |
| | | |
| Decrease Font Size | Decrease the font size. |
| Increase Font Size | Increase the font size. |
| | | |
| Shape Fill | Fill the selected shape with a solid color, gradient, picture, or texture. |
| Pen Color | Change the pen color. |
| Font Color | Change the text color. |
| | | |
| More Lines... | Show the Format Shape dialog box to specify advanced line styles. |
| Arrows | |
| | | |
| Shadow Effects | Add a shadow to the shape. |
| 3-D Effects | Add a 3-D effect to the shape. |
| Clear Formatting | Clear all the formatting from the selection, leaving only the plain text. |
| Home | |
| Insert | |
| Page Design | |
| Mailings | |
| Review | |
| View | |
| Web | |
| Developer | |
| Master Page |
What is Classic Menu for Office
The Classic Menu for Office 2010, 2013, 2016, 2019 and 365 Brings familiar classic menus and toolbars back to Microsoft Office 2010, 2013, 2016, 2019 and 365. You can use Office 2010/2013/2016 immediately and efficiently, and don't need any trainings or tutorials when upgrading to Microsoft Office (Word, Excel, Visio...) 2010/2013. The screen shot is as following.
Classic Menu for OfficeIt includes Classic Menu for Word, Excel, PowerPoint, OneNote, Outlook, Publisher, Access, InfoPath, Visio and Project 2010, 2013, 2016, 2019 and 365. |


